Go from signup to your first Figr prototype in a few minutes: create a canvas, add context, prompt, refine and hand off.
The quick path from signup to a generated prototype. For the full setup, see Set up a Context Pod.
1
Sign up and create a canvas
Sign up at figr.design, finish onboarding, then click New canvas. You can pick a Context Pod and a design system for the canvas as you create it, so Figr starts with your product’s context and components.
Start a new canvas
2
Add a little product context
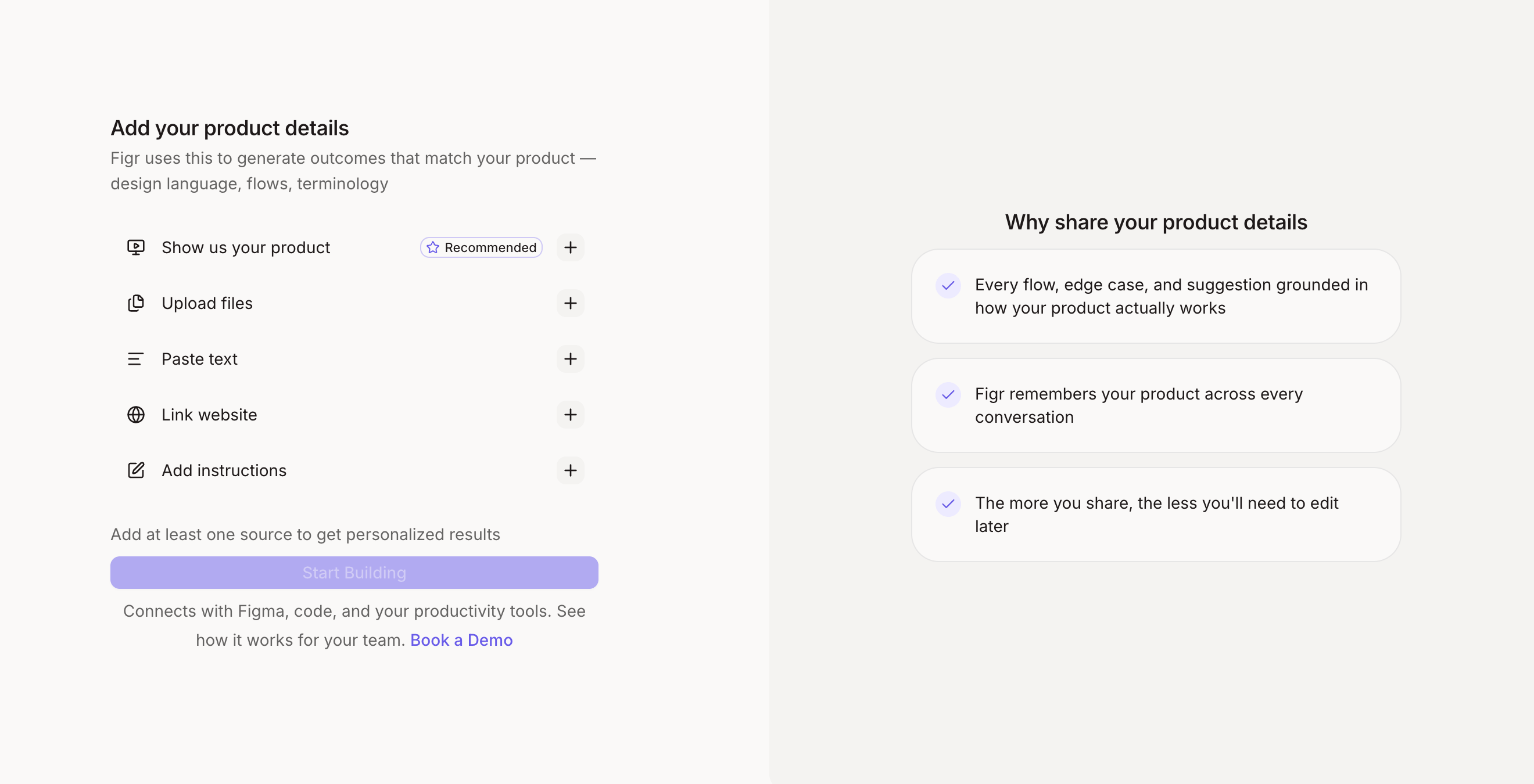
Bring in one screen, recording, doc or link so Figr understands your product. A single source already makes the output feel like your product instead of a blank-slate prompt.
Add one source to make Figr product-aware
3
Describe what you want
Write a short prompt for the screen or flow you need, and attach any context. Say who it’s for, what they need to do, and which states matter.
Chat box with attachments
4
Let Figr design
Figr reasons through the flow and builds a high-fidelity prototype in your design system.
Generated prototype
5
Review and refine
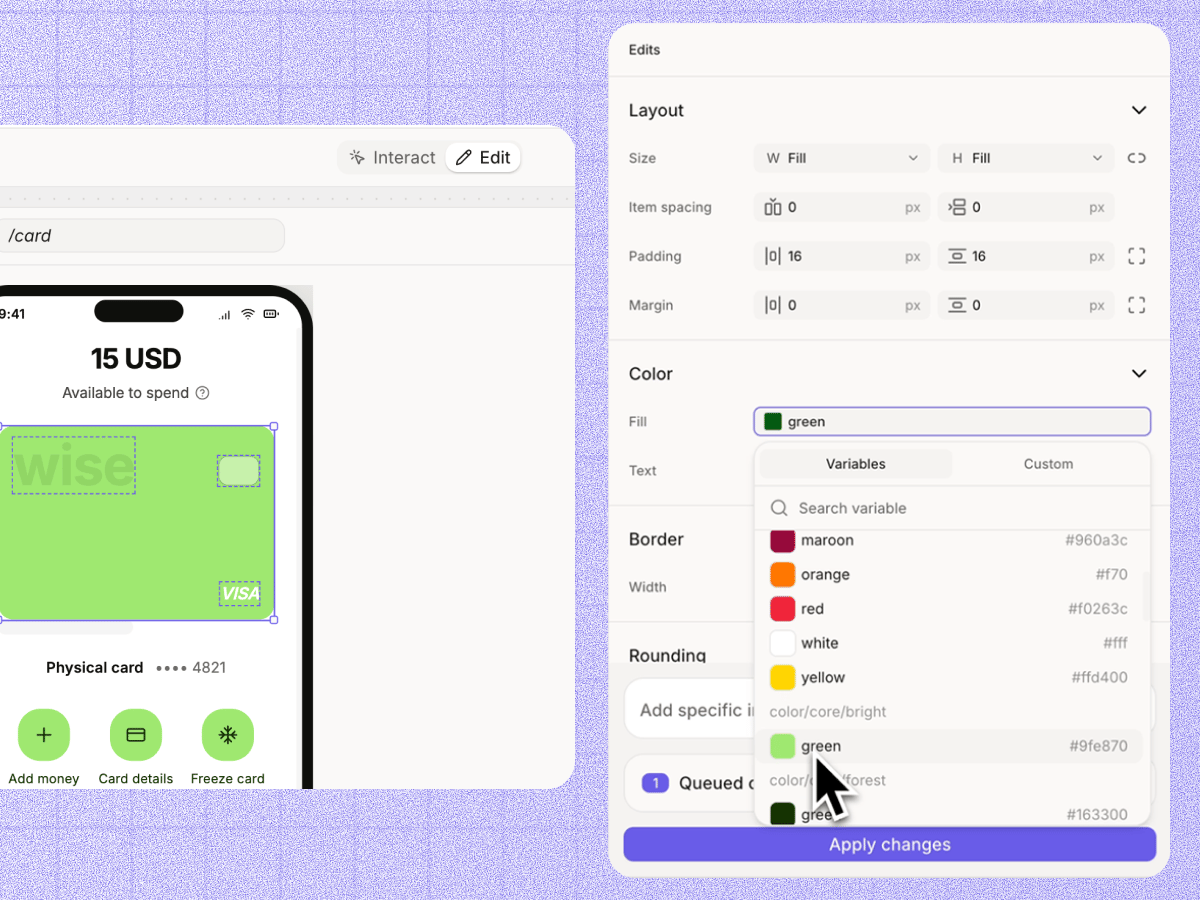
Ask for changes in chat, or click Edit on the prototype to change one part without regenerating the rest. See Manual edit.
Refine in chat or edit in place
6
Export or share
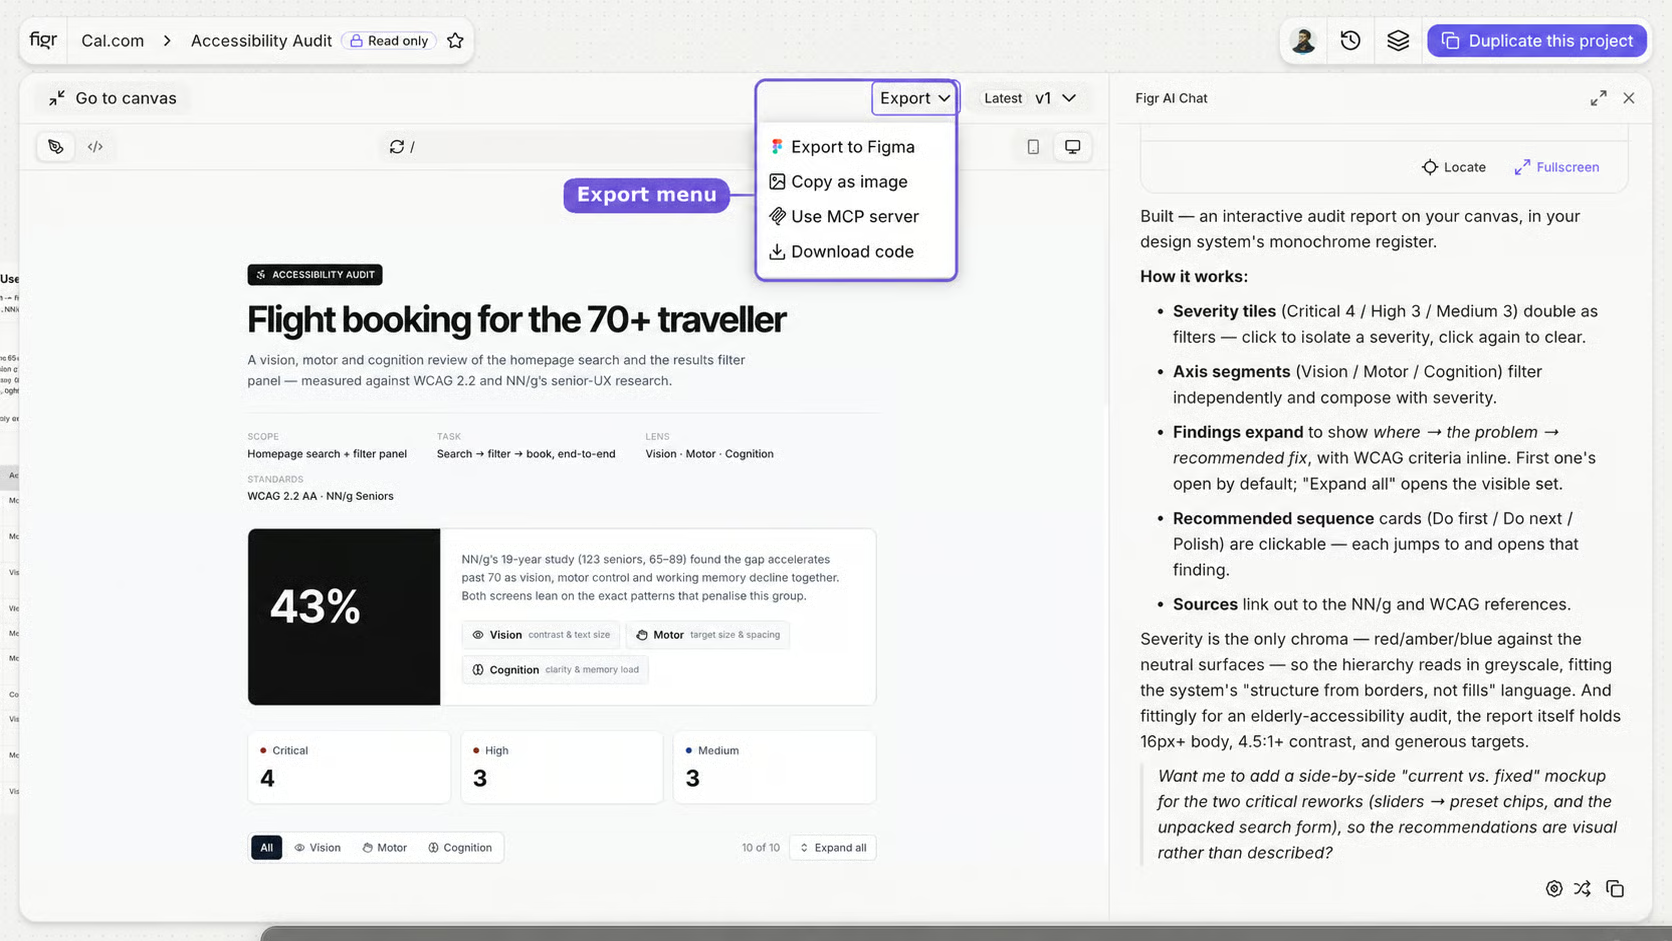
Send screens to Figma, publish a link, download images or code, or open the design in a coding agent. See Export options.
Export and share options
The more product context you add, the closer the output matches your product. Once you’ve run through this, set up your full product context and design system.
⌘I
{"docsConfig":{"theme":"maple","$schema":"https://mintlify.com/docs.json","name":"Figr AI Docs","description":"Figr is an AI product design agent for teams building on an existing product. These docs cover adding context, setting up your design system, creating prototypes, flows and PRDs, working on the canvas, and handing off to Figma and code.","colors":{"primary":"#695BE8","light":"#ACA3FF","dark":"#5B50B9"},"logo":{"light":"https://mintcdn.com/figr-1af7ae64/cM9H6DRd9CPLHDAV/logo/light.svg?fit=max\u0026auto=format\u0026n=cM9H6DRd9CPLHDAV\u0026q=85\u0026s=001dc7d33aee1df6f5a6248e52b2df1f","dark":"https://mintcdn.com/figr-1af7ae64/cM9H6DRd9CPLHDAV/logo/dark.svg?fit=max\u0026auto=format\u0026n=cM9H6DRd9CPLHDAV\u0026q=85\u0026s=e584ed008a9ef6de1884d2a211b90e36"},"favicon":"https://mintcdn.com/figr-1af7ae64/cDBtHSK2adHsdjTI/favicon.svg?fit=max\u0026auto=format\u0026n=cDBtHSK2adHsdjTI\u0026q=85\u0026s=3ce318ff6dc5c3531973eb046e22d183","appearance":{"default":"light"},"background":{"decoration":"gradient"},"navbar":{"primary":{"type":"button","label":"Design with Figr AI ↗","href":"https://app.figr.design"}},"footer":{"socials":{"x":"https://x.com/FigrDesign","instagram":"https://www.instagram.com/designwithfigr","linkedin":"https://in.linkedin.com/company/figrdesign","website":"https://figr.design/","youtube":"https://www.youtube.com/@Figr_design"}},"seo":{"metatags":{"og:type":"website","og:site_name":"Figr AI Docs","og:image":"https://docs.figr.design/images/04-01-canvas-overview.png","twitter:card":"summary_large_image","twitter:image":"https://docs.figr.design/images/04-01-canvas-overview.png"},"indexing":"navigable"},"integrations":{"ga4":{"measurementId":"G-ZH1YR36TK8"}},"errors":{"404":{"redirect":false,"title":"This page has moved or no longer exists","description":"Try [What is Figr](/), the [Quickstart](/getting-started/setup/creating-your-account), or [Export options](/export/options). You can also search the docs with ⌘K."}},"contextual":{"options":["copy","view","chatgpt","claude","perplexity","mcp","cursor","vscode"],"display":"header"},"styling":{"latex":false},"navigation":{"global":{"anchors":[{"anchor":"Documentation","icon":"book","href":"https://docs.figr.design/"},{"anchor":"Talk to Us","icon":"comments","href":"https://figr.design/contact"},{"anchor":"Blog","icon":"books","href":"https://figr.design/blog"}]},"pages":[]}},"deployment":{"deploymentMetadataValue":{"subdomain":"figr-1af7ae64","hasAudioNarration":false,"actualSubdomain":"figr-1af7ae64","customDomains":["docs.figr.design"],"gitSource":{"type":"github","owner":"mokshgarg003","repo":"mintlify-docs","deployBranch":"main","contentDirectory":"","isPrivate":false,"mountPath":"","label":""},"chroma":{"liveDeploymentHistoryId":"6ad9db34383567486ff7179f","collectionId":"7761d4c2-12dd-4f0a-9907-259664eb5ad5","schemaVersion":"v3","latestBuiltDeploymentHistoryId":"6ad9db34383567486ff7179f"},"entitlements":{},"buildId":"6ad9db34383567486ff7179f","clientVersion":"0.0.4045","searchFilterCounts":[{"language":"default","tag":"Docs","count":57},{"language":"default","tag":"Work on the canvas","count":9},{"language":"default","tag":"What Figr does","count":9},{"language":"default","tag":"Add context","count":7},{"language":"default","tag":"Create with Figr","count":7},{"language":"default","tag":"Set up your design system","count":7},{"language":"default","tag":"Export and Share","count":6},{"language":"default","tag":"Set up team context","count":4},{"language":"default","tag":"Security \u0026 Legal","count":4},{"language":"default","tag":"Design new work","count":3}]},"assistantConfig":{},"basePath":"","hasChatPermissions":false,"hasWebMcpPermissions":false,"toggles":[{"name":"kill-isr","enabled":true,"variant":{"name":"disabled","enabled":false,"feature_enabled":true},"impressionData":false},{"name":"agent-mintlify-slack","enabled":true,"variant":{"name":"disabled","enabled":false,"feature_enabled":true},"impressionData":false},{"name":"agent-integrations-settings","enabled":true,"variant":{"name":"disabled","enabled":false,"feature_enabled":true},"impressionData":false},{"name":"automations-pr-grouping","enabled":true,"variant":{"name":"disabled","enabled":false,"feature_enabled":true},"impressionData":false},{"name":"custom-prefix","enabled":true,"variant":{"name":"disabled","enabled":false,"feature_enabled":true},"impressionData":false},{"name":"analytics-v7","enabled":true,"variant":{"name":"disabled","enabled":false,"feature_enabled":true},"impressionData":false},{"name":"user-flows-analytics","enabled":true,"variant":{"name":"disabled","enabled":false,"feature_enabled":true},"impressionData":false},{"name":"no-publish-flow","enabled":true,"variant":{"name":"disabled","enabled":false,"feature_enabled":true},"impressionData":false},{"name":"workos-onboarding","enabled":true,"variant":{"name":"disabled","enabled":false,"feature_enabled":true},"impressionData":false},{"name":"llms-txt-v2","enabled":true,"variant":{"name":"disabled","enabled":false,"feature_enabled":true},"impressionData":false},{"name":"snapshot-serving-live","enabled":true,"variant":{"name":"disabled","enabled":false,"feature_enabled":true},"impressionData":false},{"name":"stripTemperatureMiddleware","enabled":true,"variant":{"name":"disabled","enabled":false,"feature_enabled":true},"impressionData":false},{"name":"support-platform-pylon-zendesk","enabled":true,"variant":{"name":"disabled","enabled":false,"feature_enabled":true},"impressionData":false},{"name":"snapshot-serving","enabled":true,"variant":{"name":"disabled","enabled":false,"feature_enabled":true},"impressionData":false},{"name":"instant-rollback","enabled":true,"variant":{"name":"disabled","enabled":false,"feature_enabled":true},"impressionData":false},{"name":"granular-notifications-server","enabled":true,"variant":{"name":"disabled","enabled":false,"feature_enabled":true},"impressionData":false},{"name":"granular-notifications","enabled":true,"variant":{"name":"disabled","enabled":false,"feature_enabled":true},"impressionData":false},{"name":"automations-fable","enabled":true,"variant":{"name":"disabled","enabled":false,"feature_enabled":true},"impressionData":false},{"name":"fixed-ai-action-pricing","enabled":true,"variant":{"name":"disabled","enabled":false,"feature_enabled":true},"impressionData":false},{"name":"automation-resolve-merge-conflict","enabled":true,"variant":{"name":"disabled","enabled":false,"feature_enabled":true},"impressionData":false},{"name":"scoped-publishing","enabled":true,"variant":{"name":"disabled","enabled":false,"feature_enabled":true},"impressionData":false},{"name":"mintql","enabled":true,"variant":{"name":"disabled","enabled":false,"feature_enabled":true},"impressionData":false},{"name":"page-level-analytics","enabled":true,"variant":{"name":"disabled","enabled":false,"feature_enabled":true},"impressionData":false},{"name":"editor-version-history-v2","enabled":true,"variant":{"name":"disabled","enabled":false,"feature_enabled":true},"impressionData":false},{"name":"billing-page-v2","enabled":true,"variant":{"name":"disabled","enabled":false,"feature_enabled":true},"impressionData":false},{"name":"full-page-search","enabled":true,"variant":{"name":"disabled","enabled":false,"feature_enabled":true},"impressionData":false},{"name":"workspace-projects","enabled":true,"variant":{"name":"disabled","enabled":false,"feature_enabled":true},"impressionData":false},{"name":"assistant-v5","enabled":true,"variant":{"name":"disabled","enabled":false,"feature_enabled":true},"impressionData":false},{"name":"byok-sep-25","enabled":true,"variant":{"name":"disabled","enabled":false,"feature_enabled":true},"impressionData":false},{"name":"fork-pr-previews","enabled":true,"variant":{"name":"disabled","enabled":false,"feature_enabled":true},"impressionData":false},{"name":"revalidation-jwt","enabled":true,"variant":{"name":"disabled","enabled":false,"feature_enabled":true},"impressionData":false},{"name":"vite-origin","enabled":true,"variant":{"name":"disabled","enabled":false,"feature_enabled":true},"impressionData":false},{"name":"billing-updated-9-15","enabled":true,"variant":{"name":"disabled","enabled":false,"feature_enabled":true},"impressionData":false},{"name":"workos-sso-scim","enabled":true,"variant":{"name":"disabled","enabled":false,"feature_enabled":true},"impressionData":false},{"name":"hobby-abuse-scan","enabled":true,"variant":{"name":"disabled","enabled":false,"feature_enabled":true},"impressionData":false},{"name":"dashboard-inbox","enabled":true,"variant":{"name":"disabled","enabled":false,"feature_enabled":true},"impressionData":false},{"name":"workos-signup","enabled":true,"variant":{"name":"disabled","enabled":false,"feature_enabled":true},"impressionData":false},{"name":"turbopuffer-dual-write","enabled":true,"variant":{"name":"disabled","enabled":false,"feature_enabled":true},"impressionData":false},{"name":"workos-enabled","enabled":true,"variant":{"name":"disabled","enabled":false,"feature_enabled":true},"impressionData":false},{"name":"approve-review-flow","enabled":true,"variant":{"name":"disabled","enabled":false,"feature_enabled":true},"impressionData":false},{"name":"sso-setup-deadline-banner","enabled":true,"variant":{"name":"disabled","enabled":false,"feature_enabled":true},"impressionData":false}],"googleFontsInlined":false},"customCss":[],"page":{"pagePath":"getting-started/setup/creating-your-account","slug":"/getting-started/setup/creating-your-account","pageMetadata":{"title":"Quickstart","description":"Go from signup to your first Figr prototype in a few minutes: create a canvas, add context, prompt, refine and hand off.","sidebarTitle":"Quickstart","icon":"rocket","href":"/getting-started/setup/creating-your-account"},"description":{"compiledSource":"\"use strict\";\nconst {jsx: _jsx} = arguments[0];\nconst {useMDXComponents: _provideComponents} = arguments[0];\nfunction _createMdxContent(props) {\n const _components = {\n p: \"p\",\n ..._provideComponents(),\n ...props.components\n };\n return _jsx(_components.p, {\n children: \"Go from signup to your first Figr prototype in a few minutes: create a canvas, add context, prompt, refine and hand off.\"\n });\n}\nfunction MDXContent(props = {}) {\n const {wrapper: MDXLayout} = {\n ..._provideComponents(),\n ...props.components\n };\n return MDXLayout ? _jsx(MDXLayout, {\n ...props,\n children: _jsx(_createMdxContent, {\n ...props\n })\n }) : _createMdxContent(props);\n}\nreturn {\n default: MDXContent\n};\n","frontmatter":{},"scope":{}},"pageType":"default","mdx":{"mdxSource":{"compiledSource":"\"use strict\";const{Fragment:_Fragment,jsx:_jsx,jsxs:_jsxs}=arguments[0];const{useMDXComponents:_provideComponents}=arguments[0];function _createMdxContent(props){const _components={a:`a`,p:`p`,strong:`strong`,..._provideComponents(),...props.components},{Frame,OptimizedFrame,OptimizedImage,Step,Steps,Tip}=_components;if(!Frame)_missingMdxReference(`Frame`,true);if(!OptimizedFrame)_missingMdxReference(`OptimizedFrame`,true);if(!OptimizedImage)_missingMdxReference(`OptimizedImage`,true);if(!Step)_missingMdxReference(`Step`,true);if(!Steps)_missingMdxReference(`Steps`,true);if(!Tip)_missingMdxReference(`Tip`,true);return _jsxs(_Fragment,{children:[_jsx(OptimizedFrame,{src:`https://www.youtube.com/embed/poOaILXCc7E`,title:`Your first 8 minutes setup in Figr`,frameBorder:`0`,className:`mint-w-full mint-aspect-video mint-rounded-xl`,allow:`accelerometer; autoplay; clipboard-write; encrypted-media; gyroscope; picture-in-picture; web-share`,allowFullScreen:true}),`\n`,_jsxs(_components.p,{children:[`The quick path from signup to a generated prototype. For the full setup, see `,_jsx(_components.a,{href:`/product-intelligence/context-pods`,children:`Set up a Context Pod`}),`.`]}),`\n`,_jsxs(Steps,{children:[_jsxs(Step,{title:`Sign up and create a canvas`,children:[_jsxs(_components.p,{children:[`Sign up at `,_jsx(_components.a,{href:`https://figr.design`,children:`figr.design`}),`, finish onboarding, then click `,_jsx(_components.strong,{children:`New canvas`}),`. You can pick a Context Pod and a design system for the canvas as you create it, so Figr starts with your product’s context and components.`]}),_jsx(Frame,{caption:`Start a new canvas`,children:_jsx(OptimizedImage,{src:`https://mintcdn.com/figr-1af7ae64/B-CZDullpzC9Nrue/images/02-01-start-new-canvas-2.png?fit=max\u0026auto=format\u0026n=B-CZDullpzC9Nrue\u0026q=85\u0026s=4695709b85674c56cfd4ff6da3482269`,alt:`The new canvas screen`,\"data-og-width\":`1672`,width:`1672`,\"data-og-height\":`941`,height:`941`,\"data-path\":`images/02-01-start-new-canvas-2.png`,\"data-optimize\":`true`,\"data-opv\":`3`,srcset:`https://mintcdn.com/figr-1af7ae64/B-CZDullpzC9Nrue/images/02-01-start-new-canvas-2.png?w=280\u0026fit=max\u0026auto=format\u0026n=B-CZDullpzC9Nrue\u0026q=85\u0026s=759a900ba187c5328b85e250937e1ff8 280w, https://mintcdn.com/figr-1af7ae64/B-CZDullpzC9Nrue/images/02-01-start-new-canvas-2.png?w=560\u0026fit=max\u0026auto=format\u0026n=B-CZDullpzC9Nrue\u0026q=85\u0026s=dae771102b11e4501e152ef1bda20aa6 560w, https://mintcdn.com/figr-1af7ae64/B-CZDullpzC9Nrue/images/02-01-start-new-canvas-2.png?w=840\u0026fit=max\u0026auto=format\u0026n=B-CZDullpzC9Nrue\u0026q=85\u0026s=82e0168c81b93785d3d291b6cc9ef134 840w, https://mintcdn.com/figr-1af7ae64/B-CZDullpzC9Nrue/images/02-01-start-new-canvas-2.png?w=1100\u0026fit=max\u0026auto=format\u0026n=B-CZDullpzC9Nrue\u0026q=85\u0026s=978694f088679c60e522fe8677cb8047 1100w, https://mintcdn.com/figr-1af7ae64/B-CZDullpzC9Nrue/images/02-01-start-new-canvas-2.png?w=1650\u0026fit=max\u0026auto=format\u0026n=B-CZDullpzC9Nrue\u0026q=85\u0026s=978a402d862b295fc30802e0361a38f0 1650w, https://mintcdn.com/figr-1af7ae64/B-CZDullpzC9Nrue/images/02-01-start-new-canvas-2.png?w=2500\u0026fit=max\u0026auto=format\u0026n=B-CZDullpzC9Nrue\u0026q=85\u0026s=afa2f73d73ea5858d9d1d14bea5a51b3 2500w`})})]}),_jsxs(Step,{title:`Add a little product context`,children:[_jsx(_components.p,{children:`Bring in one screen, recording, doc or link so Figr understands your product. A single source already makes the output feel like your product instead of a blank-slate prompt.`}),_jsx(Frame,{caption:`Add one source to make Figr product-aware`,children:_jsx(OptimizedImage,{src:`https://mintcdn.com/figr-1af7ae64/6fNHqiw94uTEs_lh/images/docs/cp-03-sources.png?fit=max\u0026auto=format\u0026n=6fNHqiw94uTEs_lh\u0026q=85\u0026s=2402f6919beeb0a96463566ac20f4aa8`,alt:`Add your product details screen with the five source options`,\"data-og-width\":`1534`,width:`1534`,\"data-og-height\":`784`,height:`784`,\"data-path\":`images/docs/cp-03-sources.png`,\"data-optimize\":`true`,\"data-opv\":`3`,srcset:`https://mintcdn.com/figr-1af7ae64/6fNHqiw94uTEs_lh/images/docs/cp-03-sources.png?w=280\u0026fit=max\u0026auto=format\u0026n=6fNHqiw94uTEs_lh\u0026q=85\u0026s=67a2f68465fac3ea7532a55c63ffd2a4 280w, https://mintcdn.com/figr-1af7ae64/6fNHqiw94uTEs_lh/images/docs/cp-03-sources.png?w=560\u0026fit=max\u0026auto=format\u0026n=6fNHqiw94uTEs_lh\u0026q=85\u0026s=e42dd606a990954bc3cf6aaf01d8a4cd 560w, https://mintcdn.com/figr-1af7ae64/6fNHqiw94uTEs_lh/images/docs/cp-03-sources.png?w=840\u0026fit=max\u0026auto=format\u0026n=6fNHqiw94uTEs_lh\u0026q=85\u0026s=5407dc0e11e916eeb298bfb6e27f95e2 840w, https://mintcdn.com/figr-1af7ae64/6fNHqiw94uTEs_lh/images/docs/cp-03-sources.png?w=1100\u0026fit=max\u0026auto=format\u0026n=6fNHqiw94uTEs_lh\u0026q=85\u0026s=5a66bf5866e53e384828618c97dda96b 1100w, https://mintcdn.com/figr-1af7ae64/6fNHqiw94uTEs_lh/images/docs/cp-03-sources.png?w=1650\u0026fit=max\u0026auto=format\u0026n=6fNHqiw94uTEs_lh\u0026q=85\u0026s=fb5197d24e5770e8b5da7df3f5ced6f7 1650w, https://mintcdn.com/figr-1af7ae64/6fNHqiw94uTEs_lh/images/docs/cp-03-sources.png?w=2500\u0026fit=max\u0026auto=format\u0026n=6fNHqiw94uTEs_lh\u0026q=85\u0026s=b2ac77186cf3ec05254c02cee7bce4ca 2500w`})})]}),_jsxs(Step,{title:`Describe what you want`,children:[_jsx(_components.p,{children:`Write a short prompt for the screen or flow you need, and attach any context. Say who it’s for, what they need to do, and which states matter.`}),_jsx(Frame,{caption:`Chat box with attachments`,children:_jsx(OptimizedImage,{src:`https://mintcdn.com/figr-1af7ae64/9R6ZCMMA1ZL6O6WC/images/canvas-chat-reference.png?fit=max\u0026auto=format\u0026n=9R6ZCMMA1ZL6O6WC\u0026q=85\u0026s=da2aeeefb689c3a54b3f3e0161d9289e`,alt:`Chat box with attachment options`,\"data-og-width\":`2880`,width:`2880`,\"data-og-height\":`1628`,height:`1628`,\"data-path\":`images/canvas-chat-reference.png`,\"data-optimize\":`true`,\"data-opv\":`3`,srcset:`https://mintcdn.com/figr-1af7ae64/9R6ZCMMA1ZL6O6WC/images/canvas-chat-reference.png?w=280\u0026fit=max\u0026auto=format\u0026n=9R6ZCMMA1ZL6O6WC\u0026q=85\u0026s=5c88de8c49b6ed0e76711a3b231c4506 280w, https://mintcdn.com/figr-1af7ae64/9R6ZCMMA1ZL6O6WC/images/canvas-chat-reference.png?w=560\u0026fit=max\u0026auto=format\u0026n=9R6ZCMMA1ZL6O6WC\u0026q=85\u0026s=99e4aa7d334d6c95b544ee931f87b692 560w, https://mintcdn.com/figr-1af7ae64/9R6ZCMMA1ZL6O6WC/images/canvas-chat-reference.png?w=840\u0026fit=max\u0026auto=format\u0026n=9R6ZCMMA1ZL6O6WC\u0026q=85\u0026s=0875f8327a44a917ac5031c9685f53be 840w, https://mintcdn.com/figr-1af7ae64/9R6ZCMMA1ZL6O6WC/images/canvas-chat-reference.png?w=1100\u0026fit=max\u0026auto=format\u0026n=9R6ZCMMA1ZL6O6WC\u0026q=85\u0026s=03b2cda678132dac421632de4324181f 1100w, https://mintcdn.com/figr-1af7ae64/9R6ZCMMA1ZL6O6WC/images/canvas-chat-reference.png?w=1650\u0026fit=max\u0026auto=format\u0026n=9R6ZCMMA1ZL6O6WC\u0026q=85\u0026s=7ea722f4915c91264adf58bd897df329 1650w, https://mintcdn.com/figr-1af7ae64/9R6ZCMMA1ZL6O6WC/images/canvas-chat-reference.png?w=2500\u0026fit=max\u0026auto=format\u0026n=9R6ZCMMA1ZL6O6WC\u0026q=85\u0026s=d956af9a87dff5704209bdb7f3cbe6b8 2500w`})})]}),_jsxs(Step,{title:`Let Figr design`,children:[_jsx(_components.p,{children:`Figr reasons through the flow and builds a high-fidelity prototype in your design system.`}),_jsx(Frame,{caption:`Generated prototype`,children:_jsx(OptimizedImage,{src:`https://mintcdn.com/figr-1af7ae64/z16Z7ZdXfoZy_c4N/images/High-Fidelity-Prototype.png?fit=max\u0026auto=format\u0026n=z16Z7ZdXfoZy_c4N\u0026q=85\u0026s=720a06542732776a72f6d7e6a4a9dbea`,alt:`A generated high-fidelity prototype`,\"data-og-width\":`3057`,width:`3057`,\"data-og-height\":`1872`,height:`1872`,\"data-path\":`images/High-Fidelity-Prototype.png`,\"data-optimize\":`true`,\"data-opv\":`3`,srcset:`https://mintcdn.com/figr-1af7ae64/z16Z7ZdXfoZy_c4N/images/High-Fidelity-Prototype.png?w=280\u0026fit=max\u0026auto=format\u0026n=z16Z7ZdXfoZy_c4N\u0026q=85\u0026s=fd710024fdbca2c6db1da5bb0853d773 280w, https://mintcdn.com/figr-1af7ae64/z16Z7ZdXfoZy_c4N/images/High-Fidelity-Prototype.png?w=560\u0026fit=max\u0026auto=format\u0026n=z16Z7ZdXfoZy_c4N\u0026q=85\u0026s=4e276b19629a4b834172900dd713f4bc 560w, https://mintcdn.com/figr-1af7ae64/z16Z7ZdXfoZy_c4N/images/High-Fidelity-Prototype.png?w=840\u0026fit=max\u0026auto=format\u0026n=z16Z7ZdXfoZy_c4N\u0026q=85\u0026s=2d6a514c94e5cd8f0b76d72b2dbcefd8 840w, https://mintcdn.com/figr-1af7ae64/z16Z7ZdXfoZy_c4N/images/High-Fidelity-Prototype.png?w=1100\u0026fit=max\u0026auto=format\u0026n=z16Z7ZdXfoZy_c4N\u0026q=85\u0026s=1cc4840ae3ebf0b29672044f292ae970 1100w, https://mintcdn.com/figr-1af7ae64/z16Z7ZdXfoZy_c4N/images/High-Fidelity-Prototype.png?w=1650\u0026fit=max\u0026auto=format\u0026n=z16Z7ZdXfoZy_c4N\u0026q=85\u0026s=87a87d77b32a4573c14aab3f88fc6aa6 1650w, https://mintcdn.com/figr-1af7ae64/z16Z7ZdXfoZy_c4N/images/High-Fidelity-Prototype.png?w=2500\u0026fit=max\u0026auto=format\u0026n=z16Z7ZdXfoZy_c4N\u0026q=85\u0026s=21e9ad77aa3cd72aba840bc88d824ca7 2500w`})})]}),_jsxs(Step,{title:`Review and refine`,children:[_jsxs(_components.p,{children:[`Ask for changes in chat, or click `,_jsx(_components.strong,{children:`Edit`}),` on the prototype to change one part without regenerating the rest. See `,_jsx(_components.a,{href:`/getting-started/tutorial/untitled-page-5`,children:`Manual edit`}),`.`]}),_jsx(Frame,{caption:`Refine in chat or edit in place`,children:_jsx(OptimizedImage,{src:`https://mintcdn.com/figr-1af7ae64/qWNhfv3i0IzJXzb7/direct-edit.png?fit=max\u0026auto=format\u0026n=qWNhfv3i0IzJXzb7\u0026q=85\u0026s=9c42522070c6a92d388caf4b9756a5aa`,alt:`Edit panel showing the properties of a selected element`,\"data-og-width\":`1200`,width:`1200`,\"data-og-height\":`900`,height:`900`,\"data-path\":`direct-edit.png`,\"data-optimize\":`true`,\"data-opv\":`3`,srcset:`https://mintcdn.com/figr-1af7ae64/qWNhfv3i0IzJXzb7/direct-edit.png?w=280\u0026fit=max\u0026auto=format\u0026n=qWNhfv3i0IzJXzb7\u0026q=85\u0026s=4a3f302c33aee76fabf1fa2490931534 280w, https://mintcdn.com/figr-1af7ae64/qWNhfv3i0IzJXzb7/direct-edit.png?w=560\u0026fit=max\u0026auto=format\u0026n=qWNhfv3i0IzJXzb7\u0026q=85\u0026s=e7dc83eece6c4cc9ea04a9fc534b50db 560w, https://mintcdn.com/figr-1af7ae64/qWNhfv3i0IzJXzb7/direct-edit.png?w=840\u0026fit=max\u0026auto=format\u0026n=qWNhfv3i0IzJXzb7\u0026q=85\u0026s=75af10bf7e3cd1a34fdf81251e70bf57 840w, https://mintcdn.com/figr-1af7ae64/qWNhfv3i0IzJXzb7/direct-edit.png?w=1100\u0026fit=max\u0026auto=format\u0026n=qWNhfv3i0IzJXzb7\u0026q=85\u0026s=8247da939c2e4b355a92d0cc30c188b3 1100w, https://mintcdn.com/figr-1af7ae64/qWNhfv3i0IzJXzb7/direct-edit.png?w=1650\u0026fit=max\u0026auto=format\u0026n=qWNhfv3i0IzJXzb7\u0026q=85\u0026s=b4cfd739639d123ebe6ce8b340d52929 1650w, https://mintcdn.com/figr-1af7ae64/qWNhfv3i0IzJXzb7/direct-edit.png?w=2500\u0026fit=max\u0026auto=format\u0026n=qWNhfv3i0IzJXzb7\u0026q=85\u0026s=dfc62a96fd49b7292029bb182497946d 2500w`})})]}),_jsxs(Step,{title:`Export or share`,children:[_jsxs(_components.p,{children:[`Send screens to Figma, publish a link, download images or code, or open the design in a coding agent. See `,_jsx(_components.a,{href:`/export/options`,children:`Export options`}),`.`]}),_jsx(Frame,{caption:`Export and share options`,children:_jsx(OptimizedImage,{alt:`Export menu on a selected prototype`,src:`https://mintcdn.com/figr-1af7ae64/HUWaCHQswfw6ncsb/images/export-menu.avif?fit=max\u0026auto=format\u0026n=HUWaCHQswfw6ncsb\u0026q=85\u0026s=a1b86c11e08a6eb12ddee394ef8db855`,\"data-og-width\":`1672`,width:`1672`,\"data-og-height\":`941`,height:`941`,\"data-path\":`images/export-menu.avif`,\"data-optimize\":`true`,\"data-opv\":`3`,srcset:`https://mintcdn.com/figr-1af7ae64/HUWaCHQswfw6ncsb/images/export-menu.avif?w=280\u0026fit=max\u0026auto=format\u0026n=HUWaCHQswfw6ncsb\u0026q=85\u0026s=2418c320e2c3d0f50b1b60ed5de8118e 280w, https://mintcdn.com/figr-1af7ae64/HUWaCHQswfw6ncsb/images/export-menu.avif?w=560\u0026fit=max\u0026auto=format\u0026n=HUWaCHQswfw6ncsb\u0026q=85\u0026s=34a935aa5b002af07489048df6399248 560w, https://mintcdn.com/figr-1af7ae64/HUWaCHQswfw6ncsb/images/export-menu.avif?w=840\u0026fit=max\u0026auto=format\u0026n=HUWaCHQswfw6ncsb\u0026q=85\u0026s=122a814923a56267ef6f494206682940 840w, https://mintcdn.com/figr-1af7ae64/HUWaCHQswfw6ncsb/images/export-menu.avif?w=1100\u0026fit=max\u0026auto=format\u0026n=HUWaCHQswfw6ncsb\u0026q=85\u0026s=821115913b264465ebe4588ea72b2008 1100w, https://mintcdn.com/figr-1af7ae64/HUWaCHQswfw6ncsb/images/export-menu.avif?w=1650\u0026fit=max\u0026auto=format\u0026n=HUWaCHQswfw6ncsb\u0026q=85\u0026s=e96f4d2f34915631f09ae0f23b38698f 1650w, https://mintcdn.com/figr-1af7ae64/HUWaCHQswfw6ncsb/images/export-menu.avif?w=2500\u0026fit=max\u0026auto=format\u0026n=HUWaCHQswfw6ncsb\u0026q=85\u0026s=98a9cbcdd880e8059ce424bf27ab7886 2500w`})})]})]}),`\n`,_jsx(Tip,{children:_jsxs(_components.p,{children:[`The more product context you add, the closer the output matches your product. Once you’ve run through this, set up your full `,_jsx(_components.a,{href:`/product-intelligence/context-pods`,children:`product context`}),` and `,_jsx(_components.a,{href:`/product-intelligence/design-system`,children:`design system`}),`.`]})})]})}function MDXContent(props={}){const{wrapper:MDXLayout}={..._provideComponents(),...props.components};return MDXLayout?_jsx(MDXLayout,{...props,children:_jsx(_createMdxContent,{...props})}):_createMdxContent(props)}return{default:MDXContent};function _missingMdxReference(id,component){throw new Error(`Expected `+(component?`component`:`object`)+\" `\"+id+\"` to be defined: you likely forgot to import, pass, or provide it.\")}","frontmatter":{},"scope":{"config":{},"pageMetadata":{"title":"Quickstart","description":"Go from signup to your first Figr prototype in a few minutes: create a canvas, add context, prompt, refine and hand off.","sidebarTitle":"Quickstart","icon":"rocket","href":"/getting-started/setup/creating-your-account"}}},"mdxSourceWithNoJs":null},"mdxExtracts":{"tableOfContents":[],"codeExamples":{}},"jsLinks":[],"dynamicCss":".mint-aspect-video {\n aspect-ratio: 16 / 9\n}\n.mint-w-full {\n width: 100%\n}\n.mint-rounded-xl {\n border-radius: 0.75rem\n}","subdomain":"figr-1af7ae64","siteName":"Figr AI Docs","title":"Quickstart - Figr AI Docs","navMaps":{"firstHrefInVersion":{},"firstHrefInLanguage":{}},"lastModified":"2026-10-21T10:40:53.508Z","originalFileLocation":"getting-started/setup/creating-your-account.mdx"},"headHtml":"\u003cscript data-mint-head>(function(){var d=document.documentElement,p=null;if(!p){try{p=localStorage.getItem(\"isDarkMode\")}catch(e){}if(p==='true')p='dark';else if(p==='false')p='light';if(p!=='light'\u0026\u0026p!=='dark'\u0026\u0026p!=='system')p=\"light\"}var r=p==='system'?(matchMedia(\"(prefers-color-scheme: dark)\").matches?'dark':'light'):p;d.classList.remove(r==='dark'?'light':'dark');d.classList.add(r);d.setAttribute(\"data-theme-preference\",p)})();\u003c/script>\u003cmeta data-mint-head name=\"description\" content=\"Go from signup to your first Figr prototype in a few minutes: create a canvas, add context, prompt, refine and hand off.\">\u003cmeta data-mint-head name=\"application-name\" content=\"Figr AI Docs\">\u003cmeta data-mint-head name=\"generator\" content=\"Mintlify\">\u003clink data-mint-head rel=\"icon\" type=\"image/png\" sizes=\"192x192\" href=\"/mintlify-assets/_mintlify/favicons/figr-1af7ae64/CumideLBGw0pf1wR/_generated/favicon/android-chrome-192x192.png\" media=\"(prefers-color-scheme: light)\">\u003clink data-mint-head rel=\"apple-touch-icon\" type=\"image/png\" sizes=\"180x180\" href=\"/mintlify-assets/_mintlify/favicons/figr-1af7ae64/CumideLBGw0pf1wR/_generated/favicon/apple-touch-icon.png\">\u003clink data-mint-head rel=\"icon\" type=\"image/png\" sizes=\"16x16\" href=\"/mintlify-assets/_mintlify/favicons/figr-1af7ae64/CumideLBGw0pf1wR/_generated/favicon/favicon-16x16.png\" media=\"(prefers-color-scheme: light)\">\u003clink data-mint-head rel=\"icon\" type=\"image/png\" sizes=\"32x32\" href=\"/mintlify-assets/_mintlify/favicons/figr-1af7ae64/CumideLBGw0pf1wR/_generated/favicon/favicon-32x32.png\" media=\"(prefers-color-scheme: light)\">\u003clink data-mint-head rel=\"shortcut icon\" type=\"image/x-icon\" href=\"/mintlify-assets/_mintlify/favicons/figr-1af7ae64/CumideLBGw0pf1wR/_generated/favicon/favicon.ico\" media=\"(prefers-color-scheme: light)\">\u003clink data-mint-head rel=\"icon\" type=\"image/png\" sizes=\"192x192\" href=\"/mintlify-assets/_mintlify/favicons/figr-1af7ae64/CumideLBGw0pf1wR/_generated/favicon-dark/android-chrome-192x192.png\" media=\"(prefers-color-scheme: dark)\">\u003clink data-mint-head rel=\"icon\" type=\"image/png\" sizes=\"16x16\" href=\"/mintlify-assets/_mintlify/favicons/figr-1af7ae64/CumideLBGw0pf1wR/_generated/favicon-dark/favicon-16x16.png\" media=\"(prefers-color-scheme: dark)\">\u003clink data-mint-head rel=\"icon\" type=\"image/png\" sizes=\"32x32\" href=\"/mintlify-assets/_mintlify/favicons/figr-1af7ae64/CumideLBGw0pf1wR/_generated/favicon-dark/favicon-32x32.png\" media=\"(prefers-color-scheme: dark)\">\u003clink data-mint-head rel=\"shortcut icon\" type=\"image/x-icon\" href=\"/mintlify-assets/_mintlify/favicons/figr-1af7ae64/CumideLBGw0pf1wR/_generated/favicon-dark/favicon.ico\" media=\"(prefers-color-scheme: dark)\">\u003cmeta data-mint-head property=\"og:title\" content=\"Quickstart - Figr AI Docs\">\u003cmeta data-mint-head property=\"og:description\" content=\"Go from signup to your first Figr prototype in a few minutes: create a canvas, add context, prompt, refine and hand off.\">\u003cmeta data-mint-head property=\"og:site_name\" content=\"Figr AI Docs\">\u003cmeta data-mint-head property=\"og:url\" content=\"https://docs.figr.design/getting-started/setup/creating-your-account\">\u003cmeta data-mint-head property=\"og:type\" content=\"website\">\u003cmeta data-mint-head property=\"og:image\" content=\"https://docs.figr.design/images/04-01-canvas-overview.png\">\u003cmeta data-mint-head property=\"og:image:width\" content=\"1200\">\u003cmeta data-mint-head property=\"og:image:height\" content=\"630\">\u003cmeta data-mint-head name=\"twitter:card\" content=\"summary_large_image\">\u003cmeta data-mint-head name=\"twitter:title\" content=\"Quickstart - Figr AI Docs\">\u003cmeta data-mint-head name=\"twitter:description\" content=\"Go from signup to your first Figr prototype in a few minutes: create a canvas, add context, prompt, refine and hand off.\">\u003cmeta data-mint-head name=\"twitter:image\" content=\"https://docs.figr.design/images/04-01-canvas-overview.png\">\u003cmeta data-mint-head name=\"twitter:image:width\" content=\"1200\">\u003cmeta data-mint-head name=\"twitter:image:height\" content=\"630\">\u003cmeta data-mint-head name=\"msapplication-config\" content=\"/mintlify-assets/_mintlify/favicons/figr-1af7ae64/CumideLBGw0pf1wR/_generated/favicon/browserconfig.xml\">\u003cmeta data-mint-head name=\"apple-mobile-web-app-title\" content=\"Figr AI Docs\">\u003cmeta data-mint-head name=\"msapplication-TileColor\" content=\"#695BE8\">\u003clink data-mint-head rel=\"canonical\" href=\"https://docs.figr.design/getting-started/setup/creating-your-account\">\u003clink data-mint-head rel=\"alternate\" type=\"application/xml\" href=\"/sitemap.xml\">\u003clink data-mint-head rel=\"alternate\" type=\"text/markdown\" href=\"/getting-started/setup/creating-your-account.md\">\u003cscript data-mint-head type=\"application/ld+json\">{\"@context\":\"https://schema.org\",\"@graph\":[{\"@type\":\"Organization\",\"@id\":\"https://docs.figr.design/#organization\",\"name\":\"Figr AI Docs\",\"url\":\"https://docs.figr.design\",\"logo\":{\"@type\":\"ImageObject\",\"url\":\"https://mintcdn.com/figr-1af7ae64/cM9H6DRd9CPLHDAV/logo/light.svg?fit=max\u0026auto=format\u0026n=cM9H6DRd9CPLHDAV\u0026q=85\u0026s=001dc7d33aee1df6f5a6248e52b2df1f\"}},{\"@type\":\"WebSite\",\"@id\":\"https://docs.figr.design#website\",\"name\":\"Figr AI Docs\",\"url\":\"https://docs.figr.design\",\"publisher\":{\"@id\":\"https://docs.figr.design/#organization\"}},{\"@type\":\"WebPage\",\"@id\":\"https://docs.figr.design/getting-started/setup/creating-your-account#webpage\",\"url\":\"https://docs.figr.design/getting-started/setup/creating-your-account\",\"name\":\"Quickstart\",\"description\":\"Go from signup to your first Figr prototype in a few minutes: create a canvas, add context, prompt, refine and hand off.\",\"dateModified\":\"2026-10-21T10:40:53.508Z\",\"isPartOf\":{\"@id\":\"https://docs.figr.design#website\"},\"breadcrumb\":{\"@id\":\"https://docs.figr.design/getting-started/setup/creating-your-account#breadcrumb\"}},{\"@type\":\"BreadcrumbList\",\"@id\":\"https://docs.figr.design/getting-started/setup/creating-your-account#breadcrumb\",\"itemListElement\":[{\"@type\":\"ListItem\",\"position\":1,\"name\":\"Welcome to Figr\",\"item\":\"https://docs.figr.design/getting-started/welcome/introduction\"},{\"@type\":\"ListItem\",\"position\":2,\"name\":\"Quickstart\",\"item\":\"https://docs.figr.design/getting-started/setup/creating-your-account\"}]},{\"@type\":[\"Article\",\"TechArticle\"],\"@id\":\"https://docs.figr.design/getting-started/setup/creating-your-account#article\",\"headline\":\"Quickstart\",\"name\":\"Quickstart\",\"description\":\"Go from signup to your first Figr prototype in a few minutes: create a canvas, add context, prompt, refine and hand off.\",\"url\":\"https://docs.figr.design/getting-started/setup/creating-your-account\",\"mainEntityOfPage\":{\"@id\":\"https://docs.figr.design/getting-started/setup/creating-your-account#webpage\"},\"image\":\"https://docs.figr.design/images/04-01-canvas-overview.png\",\"dateModified\":\"2026-10-21T10:40:53.508Z\",\"publisher\":{\"@id\":\"https://docs.figr.design/#organization\"},\"isPartOf\":{\"@id\":\"https://docs.figr.design#website\"}}]}\u003c/script>\u003cscript data-mint-head type=\"application/ld+json\">{\"@context\":\"https://schema.org\",\"@type\":\"WebSite\",\"name\":\"Figr AI Docs\",\"creator\":{\"@type\":\"Organization\",\"name\":\"Mintlify\",\"url\":\"https://mintlify.com\"}}\u003c/script>","siteName":"Figr AI Docs","nav":{"global":{"anchors":[{"anchor":"Documentation","icon":"book","href":"https://docs.figr.design/"},{"anchor":"Talk to Us","icon":"comments","href":"https://figr.design/contact"},{"anchor":"Blog","icon":"books","href":"https://figr.design/blog"}]},"tabs":[{"tab":"Docs","icon":"book","pages":[{"group":"Welcome to Figr","pages":[{"title":"Introduction","sidebarTitle":"Introduction","description":"Welcome to Figr docs ","icon":"book-open","href":"/getting-started/welcome/introduction"},{"title":"Quickstart","sidebarTitle":"Quickstart","icon":"rocket","href":"/getting-started/setup/creating-your-account"}]},{"group":"What Figr does","pages":[{"title":"What Figr does","sidebarTitle":"Overview","description":"Eight jobs Figr takes off your product team's plate, from research to handoff.","icon":"compass","href":"/what-figr-does/overview"},{"group":"Design new work","icon":"pen-nib","pages":[{"title":"Add a feature to a journey you already ship","sidebarTitle":"Add to an existing journey","href":"/what-figr-does/add-to-existing-journey"},{"title":"Turn research and walkthroughs into journeys and flows","sidebarTitle":"Research to flows","href":"/what-figr-does/research-to-flows"},{"title":"From many directions to one decision","sidebarTitle":"Many directions, one decision","href":"/what-figr-does/explore-and-sign-off"}]},{"group":"Improve what you have","icon":"wrench","pages":[{"title":"See every screen a change touches before you scope it","sidebarTitle":"See what a change touches","href":"/what-figr-does/change-impact"},{"title":"Audit and redesign a flow from a screen recording","sidebarTitle":"Audit and redesign","href":"/what-figr-does/audit-and-redesign"}]},{"group":"Design system","icon":"palette","pages":[{"title":"Make your design system AI-ready","sidebarTitle":"AI-ready design system","href":"/what-figr-does/ai-ready-design-system"}]},{"group":"Hand off","icon":"paper-plane","pages":[{"title":"Take a PM's first draft into Figma without rebuilding it","sidebarTitle":"Draft to Figma","href":"/what-figr-does/mock-to-figma"},{"title":"Hand off to engineering in their code and their agent","sidebarTitle":"Hand off to engineering","href":"/what-figr-does/handoff-to-engineering"}]}]},{"group":"How to Begin?","hidden":true,"expanded":true,"pages":[{"group":"Welcome to Figr","hidden":true,"pages":[{"title":"Product-aware designing","href":"/getting-started/welcome/product-aware-designing"},{"title":"Who should use Figr","sidebarTitle":"Who should use Figr","href":"/getting-started/welcome/who-should-use-figr"}]},{"group":"Getting Started","hidden":true,"pages":[{"title":"Add product context","sidebarTitle":"Add product context","href":"/getting-started/setup/add-product-context"},{"title":"Invite your team","href":"/getting-started/setup/invite-team"},{"title":"Earn more credits","href":"/getting-started/setup/referral"}]},{"group":"Product Design Flow","hidden":true,"pages":[{"title":"Understanding the workflow","sidebarTitle":"Understanding workflow","href":"/getting-started/tutorial/understanding-workflow"},{"title":"What Figr creates","sidebarTitle":"What Figr creates","href":"/getting-started/tutorial/what-figr-creates"},{"title":"Brainstorm ideas","sidebarTitle":"Brainstorm ideas","href":"/getting-started/tutorial/brainstorm"},{"title":"UX review","sidebarTitle":"UX review","href":"/getting-started/tutorial/review"}]}]},{"group":"Add context","pages":[{"title":"Input guide","sidebarTitle":"Input guide","icon":"map","href":"/input-research/input-guide"},{"title":"Record a product walkthrough","sidebarTitle":"Record a walkthrough","icon":"video","href":"/input-research/screen-recording"},{"title":"Add files to your chat","sidebarTitle":"Add files and references","icon":"file-arrow-up","href":"/input-research/files-research"},{"title":"Bring in Figma frames","sidebarTitle":"Bring in Figma frames","icon":"figma","iconType":"brands","href":"/input-research/figma-input"},{"group":"Capture a webpage","icon":"globe","pages":[{"title":"Capture a public page","sidebarTitle":"Capture a public page","href":"/context/capture-public-page"},{"title":"Capture a page behind a login","sidebarTitle":"Capture a page behind a login","href":"/input-research/chrome-extension"}]},{"title":"Connect your tools","sidebarTitle":"Connect your tools","icon":"plug","href":"/product-intelligence/connectors"}]},{"group":"Set up team context","pages":[{"title":"Set up a Context Pod","sidebarTitle":"Set up a Context Pod","icon":"box-archive","href":"/product-intelligence/context-pods"},{"title":"Share a pod with your team","sidebarTitle":"Share a pod with your team","icon":"share-nodes","href":"/context/share-pod"},{"title":"Set up org-wide context","sidebarTitle":"Set up org-wide context","icon":"building","href":"/context/org-wide-context"},{"title":"Add skills and guardrails","sidebarTitle":"Skills and guardrails","icon":"shield-halved","href":"/context/skills-guardrails"}]},{"group":"Set up your design system","pages":[{"title":"Set up your design system from Figma","sidebarTitle":"From Figma","icon":"palette","href":"/product-intelligence/design-system"},{"title":"Set up your design system from Storybook","sidebarTitle":"From Storybook","icon":"book","href":"/design-system/storybook"},{"title":"Set up your design system from an npm package","sidebarTitle":"From an npm package","icon":"npm","iconType":"brands","href":"/design-system/npm-package"},{"title":"Set up your design system from your code repo","sidebarTitle":"From your code repo","icon":"code-branch","href":"/design-system/code-repo"},{"title":"Add brand assets","sidebarTitle":"Add brand assets","icon":"image","href":"/design-system/brand-assets"},{"title":"Switch design systems in chat","sidebarTitle":"Switch design systems in chat","icon":"shuffle","href":"/design-system/switch-design-systems"},{"title":"Update components in Figma","sidebarTitle":"Update components in Figma","icon":"arrows-rotate","href":"/design-system/update-figma-components"}]},{"group":"Create with Figr","pages":[{"title":"Build a prototype","sidebarTitle":"Build a prototype","icon":"wand-magic-sparkles","href":"/getting-started/tutorial/prototypes"},{"title":"Redesign an existing screen","sidebarTitle":"Redesign an existing screen","icon":"pen-ruler","href":"/create/redesign"},{"title":"Map a user flow","sidebarTitle":"Map a user flow","icon":"route","href":"/create/map-user-flow"},{"title":"Sketch wireframes","sidebarTitle":"Sketch wireframes","icon":"object-group","href":"/create/wireframes"},{"title":"Write PRDs and docs","sidebarTitle":"Write PRDs and docs","icon":"file-lines","href":"/getting-started/tutorial/create-prds"},{"title":"Map edge cases","sidebarTitle":"Map edge cases","icon":"triangle-exclamation","href":"/getting-started/tutorial/map-edge-cases"},{"title":"Generate test cases","sidebarTitle":"Generate test cases","icon":"list-check","href":"/create/test-cases"}]},{"group":"Work on the canvas","pages":[{"title":"Canvas overview","sidebarTitle":"Canvas overview","icon":"table-cells-large","href":"/canvas/canvas-overview"},{"title":"Manual edit","sidebarTitle":"Manual edit","icon":"pen","href":"/getting-started/tutorial/untitled-page-5"},{"title":"Run multiple chats on one canvas","sidebarTitle":"Run multiple chats","icon":"comments","href":"/canvas/multiple-chats"},{"title":"Arrange and connect nodes","sidebarTitle":"Arrange and connect nodes","icon":"folder-tree","href":"/canvas/organize"},{"title":"Comments","sidebarTitle":"Comments","icon":"comment","href":"/canvas/comments"},{"title":"Add annotations","sidebarTitle":"Add annotations","icon":"highlighter","href":"/canvas/annotations"},{"title":"Duplicate or fork a chat","sidebarTitle":"Duplicate or fork a chat","icon":"clone","href":"/canvas/duplicate-fork"},{"title":"Item actions","sidebarTitle":"Item actions","icon":"square-check","href":"/canvas/action-items"},{"title":"Version control in Figr","sidebarTitle":"Version control","icon":"clock-rotate-left","href":"/canvas/history-layers"}]},{"group":"Export and Share","pages":[{"title":"Export options","sidebarTitle":"Export options","icon":"arrow-up-from-bracket","href":"/export/options"},{"title":"Export to Figma","sidebarTitle":"Export to Figma","icon":"figma","iconType":"brands","href":"/export/figma"},{"title":"Figr MCP","sidebarTitle":"Figr MCP","icon":"server","href":"/export/mcp"},{"title":"Copy and download","sidebarTitle":"Copy and download","icon":"download","href":"/export/copy-download"},{"title":"Publish a prototype","sidebarTitle":"Publish a prototype","href":"/export/publish"},{"title":"Share a project","sidebarTitle":"Share a project","href":"/export/share-project"}]},{"group":"Account and Settings","pages":[{"title":"Usage and Credits","hidden":true,"href":"/page1"},{"title":"Account Settings","hidden":true,"href":"/page2"},{"title":"Billing and Plans","hidden":true,"href":"/page4"},{"title":"Members and Roles","hidden":true,"href":"/page3"},{"title":"Connected Apps","hidden":true,"href":"/page5"},{"title":"SSO","hidden":true,"href":"/page6"}]},{"group":"Roles and Permissions","hidden":true,"pages":[{"title":"Canonical Roles and Permissions","href":"/yea"},{"title":"Domain Auto-join","href":"/yes-3"},{"title":"Usage and Audit Logs","href":"/yes-4"}]},{"group":"Troubleshooting","hidden":true,"pages":[{"title":"Troubleshooting","icon":"screwdriver-wrench","sidebarTitle":"Troubleshooting","href":"/aryan"}]},{"group":"Security \u0026 Legal","pages":[{"title":"Legal for Enterprise","sidebarTitle":"Legal for Enterprise","href":"/docs/security-and-legal/enterprise-legal"},{"title":"Terms of Service","sidebarTitle":"Terms","href":"/legal/terms"},{"title":"Privacy Policy","sidebarTitle":"Privacy","href":"/legal/privacy"},{"title":"Data Protection","sidebarTitle":"Data Protection","href":"/legal/data-protection"}]},{"group":"Inputs","hidden":true,"pages":[{"title":"Figma Input","href":"/yes"},{"title":"Screen Recording","href":"/inputs/screen-recording"},{"title":"Direct editing","href":"/export/direct-editing"},{"title":"Prompt Library","href":"/prompt-library"}]},{"group":"Design Intelligence","hidden":true,"pages":[{"title":"Figr MCP","href":"/docs/design-intelligence/figr-mcp"},{"title":"Design System","href":"/design-intelligence/design-system"},{"title":"Context Pod","href":"/design-intelligence/product-context"},{"title":"Memories","sidebarTitle":"Memories","href":"/design-intelligence/product-memory"},{"title":"Build a design system from the screens you already have","sidebarTitle":"Design system from screens","href":"/what-figr-does/design-system-from-screens"},{"title":"Build high-fidelity prototypes that follow your design system","sidebarTitle":"DS compliant prototypes","href":"/what-figr-does/ds-compliant-prototypes"}]},{"group":"Product Thinking","hidden":true,"pages":[{"title":"Brainstorm \u0026 Thinking","href":"/product-thinking/brainstorm"},{"title":"Prototype","href":"/product-thinking/prototype"},{"title":"Review Design","href":"/product-thinking/review-design"}]},{"group":"Research","hidden":true,"pages":[{"title":"Web Search","href":"/research/web-search"},{"title":"Design Inspiration","href":"/research/design-inspiration"}]},{"group":"Credits \u0026 Billing","pages":[{"title":"Credits \u0026 Usage","sidebarTitle":"Credits \u0026 Usage","href":"/account/credits-usage"},{"title":"Team Invitations","sidebarTitle":"Team Invitations","href":"/getting-started/setup/team-invitations"}]}]},{"tab":"FAQs","icon":"question","pages":[{"title":"FAQs","href":"/faqs"}]},{"tab":"Changelog","icon":"clock","pages":[{"title":"Changelog","href":"/changelog"}]}]},"basePath":"","title":"Quickstart - Figr AI Docs","buildId":"dpl_36EDyZCDfRuoUD9af5CH4M1bqY2h","deploymentId":"dpl_36EDyZCDfRuoUD9af5CH4M1bqY2h","dynamics":["07c022d89b","a74be98ba7"],"chunks":["Frame-DW6UFrUy.js","DynamicMarkdown-B62XqCSI.js","zoom-image-lightbox-eHyQ0tlO.js","lightbox-handle-r17bVUz3.js"]}